venerdì 31 ottobre 2008

Tavolino extra-large

http://ikeahacker.blogspot.com/2008...ffee-table.html

Questa è una modifica di Ran, che desiderava un tavolino basso e largo, ma non ne trovava uno che soddisfacesse questi due requisiti. Così ne ha ricavato uno dalle mensole Lack. Mi piacciono molto la dimensione e la striscia bianca. Sarebbe stato grandioso anche con le gambe Capita.

Dice: “Avevo pensato di usare la superficie di una scrivania e dei piedi regolabili, ma alla fine mi è venuta l’idea di usare le mensole Lack – sono più economiche e disponibili in colori più vivaci.


Ho realizzato questo tavolino dalle mensole Lack. Ne ho usate cinque per formare la superficie e ho usato i montanti per i muri come gambe. Quelle spugnette alla base delle gambe sono anche loro Ikea, ma non ne ricordo il nome.

Non è un lavoro molto “pulito”:avrei potuto fare un lavoro migliore nell’assemblaggio delle mensole, ma ho preso solo due scarti di legno che ho trovato nell’immondizia fuori del mio appartamento, un po’ di colla per legno e tre tipi diversi di vite per i montanti perché non ne avevo a sufficienza di un tipo solo. È abbastanza basso da non riuscire a vedere la parte inferiore a meno che non ci si metta a strisciare sotto, quindi non mi faccio problemi più di tanto.


Il risultato finale è comunque piuttosto gradevole – è abbastanza stabile ed economico, considerate le dimensioni spaziose. Anche se non è grande tanto quanto altri tavolini che ho visto, è molto più spesso ed è difficile trovarne così. Siccome le mensole Lack sono disponibili in vari colori (in Israele almeno) si possono fare molte combinazioni."

giovedì 30 ottobre 2008

Asta microfonica Antifoni

http://ikeahacker.blogspot.com/2008...hone-stand.html

Un’elegante asta per microfono da parte di Sam. Possiede tutta la manovrabilità necessaria e ti fa sentire come in un vero studio. Il microfono è attaccato con la super colla sulla lampada da lavoro Antifoni.

prima

dopo


Visualizza altri dettagli dell’asta microfonica di Sam.

mercoledì 29 ottobre 2008

Tavolo da taglio XL

http://ikeahacker.blogspot.com/2008...ting-table.html

Un marito è una buona cosa, è quello che inizio a pensare guardando le recenti modifiche. L’abile maritino Larry ha messo su in quattr’e quattr’otto questa tavolo da taglio per l’attività di sartoria della moglie.

Dice: “Mia moglie gestisce un’attività di sartoria e vendita di tessuti online e ha preso da poco un laboratorio. Desiderava un tavolo da taglio nuovo con un paio di requisiti:

  • Doveva essere grande, davvero grande.
  • Doveva essere liscio per non far arricciare il tessuto una volta steso e durante il taglio.
  • Doveva essere alto, più alto dei normali tavoli.

Un pannello truciolare laminato (da Loews), orlato di legno di quercia, su un paio di scrivanie e gambe Galant. Le gambe Galant aumentano la superficie più di un metro, dando vita a un piano di lavoro davvero molto comodo.


Davvero molto carino, l’oggetto ideale fatto apposta per lo scopo senza dissanguarsi (il tutto è costato meno di 350$)”.


Ecco il “taglio e cucito” inaugurale attorno al nuovo tavolo.

Visualizza altri dettagli del megatavolo da taglio.

martedì 28 ottobre 2008

Lanterna di Halloween senza zucca

http://ikeahacker.blogspot.com/2008...ns-pumpkin.html

Un po’ di umorismo per una stagione spettrale.

Una lanterna di Halloween
Ben ci mostra la sua lanterna di Halloween, fatta con un tubetto da 8 ml di acquerelli Cotman arancione cadmio, un paralume per lampada a sospensione Regolit di carta da 30 cm di diametro e un filo elettrico per lampada Hemma. Bastano un’ora o due ed ecco la vostra Jack-o’-Lantern.


Che ne pensate? Dovrebbe disegnarci su una faccia da Jack-o’-Lantern o lasciarla così come una luna piena da licantropi?

Visualizza altri dettagli della Jack-o-Lantern Regolit

Non è Halloween senza la zucca Ikea
Beh, la prossima non è proprio una modifica, più uno scherzo. È una zucca di Halloween da montare, completa di marchio Ikea, di dadi, bulloni e istruzioni illustrate confusionarie. Conrad, mi hai riempito la giornata.


Visualizza altri dettagli della zucca da montare di Conrad.

venerdì 17 ottobre 2008

Che ne dite di questa scrivania?

http://ikeahacker.blogspot.com/2008...orkstation.html

Rob di Austin ha realizzato questo splendido set scrivania+ripiano salvaspazio con abile utilizzo di armadietti Effektiv, storage cabinets, ante Effektiv, maniglie Lansa, e diversi piani in faggio Pronomen.


Visualizza altri dettagli del set scrivania+ripiano di Rob.

giovedì 16 ottobre 2008

Rosso, azzurro, giallo, verde? Che colore preferisci?

http://ikeahacker.blogspot.com/2008...-colour-do.html

Marc mi ha passato questa idea di scrivania camaleontica (vedi Apartment Therapy's Unplggd).


Vince Welter ha aggiunto le barre luminose Dioder multicolori alla sua scrivania Vika Lauri con del vetro opacizzato e dei bordi di alluminio. Le barre luminose sono posizionate verso la parte frontale. Basta un tocco sull’interruttore e partono.


Altri dettagli su Unplggd o il set di flickr di Vince.

mercoledì 15 ottobre 2008

Realizza una Luminaria messicana

http://ikeahacker.blogspot.com/2008...-luminaria.html

Con della carta, Erica ha recuperato una luce Iviken rotta.

Dice: “Ho modificato una luce Iviken – ne ho due,ma il vetro di una si è rotto. Non volevo buttarla così ho seguito le istruzioni sul sito The Paper Studio website (vedi il video come realizzare una luminaria”), ho comprato della carta, del nastro biadesivo e voilà! La mia foto sotto non le rende giustizia. Ho preso un po’ di carta fatta a mano a 8$ e ora ho un bel po’ da fare con l’altra luce. Qualcuno per caso vuole un po’di frammenti di vetro per la sua Iviken?!”

Iviken Originale

Iviken Nuova

martedì 14 ottobre 2008

Laboratorio da sballo per gente giovane

http://ikeahacker.blogspot.com/2008...craft-room.html

Ogni tanto ricevo modifiche per laboratori che mi fanno diventare davvero verde d’invidia. Eccone una. Beata te, Kari!

Kari dice: “Ho da poco traslocato in una nuova casa e finalmente posso dirmi fortunata perché ho una stanza intera da dedicare ai miei hobby e lavori manuali. Faccio molti lavori di cucito e avevo bisogno di una superficie di lavoro grande, liscia e alta (per non rovinarmi la schiena) dove poter stendere i tessuti. Avevo anche bisogno di un vano ripostiglio.


Ho risolto comprando 4 mobiletti da cucina (60 e 62 cm). Dopo averli assemblati (io e mio marito), li abbiamo imbullonati sul fondo e abbiamo aggiunto piedi intarsiati (per renderli più alti e più graziosi).


Li abbiamo ribaltati e abbiamo realizzato la parte superiore in MDF. L’abbiamo rivestita con una bella stoffa (in realtà è una tenda da doccia per la larghezza) che abbiamo spillato sotto il bordo.


Abbiamo sovrapposto una lastra di vetro che avevamp. Il tocco finale sono stati gli orli di legno per nascondere le giunture tra i mobiletti e un binario Ikea (Bygel). Secondo me è venuta su molto bene ed è funzionale proprio come speravo. Un tavolo di lavoro largo (con la fessura per sedersi) che può contenere tonnellate di roba.


Dall’altro lato della stanza avevo bisogno di una scrivania. Abbiamo usato ancora un mobiletto per cucina Ikea (uno da 60 e uno da 45cm), con i cassetti da un lato e l’anta dall’altro. Abbiamo apposto un bancone da cucina bianco (Pragel) e abbiamo aggiunto piedi e pomi di vetro. Quando ho avvicinato la sedia ho scoperto che (ops!) il tavolo era più alto della media perché è un bancone. Perciò ho dovuto comprare uno sgabello(Ikea Henriksdal). Ho modificato il rivestimento originale aggiungendo un po’di stoffa Ikea (Fredrika) attorno al fondo dello sgabello per personalizzarlo".

lunedì 13 ottobre 2008

Che ne dite di questa minicassetta degli attrezzi?

http://ikeahacker.blogspot.com/2008...t-tool-box.html

Ho visto molte modifiche sulla minicassettiera Fira, la maggior parte decorative. Questa di PK Shiu è una nuova trovata. Ne è venuta fuori una cassetta per gli attrezzi dall’aspetto ordinato, ma credo ci voglia una mano di vernice rossa.


Dice: “Non più di dieci minuti per trasformare una banale minicassettiera Fira in una cassetta per gli attrezzi high tech per il mio materiale elettronico."

PK ha aggiunto solo delle maniglie Kosing in cima. Tracciate la mediana sui cassettini superiori, avvitate le maniglie lontano abbastanza dai bordi altrimenti i cassetti non possono aprirsi (ha aggiunto 4 rondelle perché le viti erano lunghe) prima di montare normalmente la minicassettiera.


Visualizza altri dettagli della minicassetta degli attrezzi high tech di PK Shiu.

venerdì 10 ottobre 2008

What's with Helmer, the 24 core Linux cluster?

http://ikeahacker.blogspot.com/2008...ux-cluster.html

When it first came out a shipload of people [thank you! you know who you are] tipped me on this hack - a Linux cluster Janne ingeniously built into a Helmer drawer cabinet to help with 3D rendering. [via Hack a day] It's not pretty but I've been told that it works wonderfully.


Click here to read the story of Helmer, a Linux cluster in a cabinet.

If you liked that you're gonna love his ideas for Helmer II and III (though I don't think it's a Helmer anymore).

Tim's version (updated 12 January 2009)
When Tim came up with the idea himself, and selected the Helmer cabinet as the ideal case for a cluster, 5 minutes later, he saw Janne's story on Digg.com. Guess great minds really do think alike.

Tim says, "For many applications such as real-time stock prediction algorithms or brain simulations, there is a need for extremely fast and massively parallel computing in the form of a computer cluster. We imagined there existed some kind of cabinet that would be perfect for housing a bunch of hand-built computers, and we found that in Ikea's Helmer. Each computer in the cluster fit inside a single drawer and consisted of a motherboard, power supply, RAM, quad-core CPU w/ fan, and hard drive. The final product is an inexpensive well-ventilated 24-core supercomputer in an impressive 2.65 cubic feet.

The difference is that my design is cleaner and cheaper. For instance his entire cluster cost around $5000 when I did it for $2550. Also, I kept all the drawers intact, putting one computer in each drawer for a total of six. He had wires hanging out all over the place and actually uses two wire that he has to touch together to start each computer - I added a push button to the front of each drawer. Well, like you said in your story - "it's not pretty...", and I took the idea to the next level of elegance. In fact from the front you can barely tell that there's even a supercomputer in it besides one small button on the front of each drawer."


Click to view more of Tim's 24-Core Linux Cluster.

giovedì 9 ottobre 2008

Now you see it, now you don't kitchen countertop

http://ikeahacker.blogspot.com/2008...nt-kitchen.html

Madga is blessed to have 2 "designer guys" living with her and whipping up such great stuff. With my kitchen, I would so love to have an extra countertop that tucks away nicely. The extra pull out shelf for the coffee maker is an awesome idea.

She says, "Since we have a really small kitchen we have to find storage for everything even some extra countertop. My two designers guys (my dad and my husband) made this for me.

It's a countertop made from a top of a black Lack table (found in the "As is" section of our Ikea store ) and a basic rail from the local hardware store. So, as you can see, in the morning all is hidden behind the aluminum curtain of my Avsikt cabinet.


My coffee maker has a little shelf of its own too just to make it more convenient in the morning (it's a little extra hack for this cabinet made out of a piece found in the "As Is" section also). It's very useful for preparing coffee and toasts in the morning: I just pull it out and voilà some extra countertop!"

mercoledì 8 ottobre 2008

Good looking banquette from the Akurum

http://ikeahacker.blogspot.com/2008...rom-akurum.html

Sorry for the spotty posting. Have been running around like a headless chicken - work, some personal projects, helping a friend set up his fish farm. It's all good, but leaves me a little tired and sleep deprived. Hope to get back on speed with hacks today onwards.

These 2 are from Peggy who lives in Switzerland. She says, "When I have some spare time, I try to think about good solutions to my everyday life problems around the house, and when I have even more time... then I realise the projects (and sometimes, it takes weeks to get it done even if it would be a matter of a few hours to do it with nothing and no one coming in between! (I have 3 kids!)

Here's one completed kitchen bench made with Faktum (called Akurum in the US) horizontal wall cabinets and Capita legs on which I fitted a MDF top (cut - paint - screw on).


We sat directly on the cabinets (not so good looking and a bit narrow) for about two weeks because it took me some time to get the MDF. It was fine for the kids... but it started creaking a bit under 'adult' weight! It was about time I finished! To make it more comfortable, the MDF is 50cm (cabinets are 40cm). I attached a long 3cm x 6cm piece of wood to the walls to support the MDF at the back. In the cabinets, I store stuff that I don't need on an everyday basis.

The other hack is an 'olde hack' or 'outdated hack' 'cause the piece is not available anymore (and that's too bad really! I think it was called Blista)... But I think it still illustrates an very important mathematical reality:

CD case = toilet paper roll! :o) It's good to keep that in mind for future hacks!"

lunedì 6 ottobre 2008

Umanonion's hacks

http://ikeahacker.blogspot.com/2008...ions-hacks.html

Umanonion sends me 2 hacks. I really like the checkerboard look on the armchair (name forgotten).

Umanonion says, "The chair was covered in a plain silver/grey fabric which I removed and replaced with black nylon for the seat and then wove black and white 4" wide strips of elastic. The white strips are closed loops as they just slid over the frame. The black strips have velcro closings at the bottom.


The other is a set of the Miriam lights (link no longer available) that came with a basic plastic sheet with the image of a flower, leaf or similar motif (yawn). I had squares of 1/4" thick plexi cut, covered them with white rice paper, and then floated squares of tin centered on the plexi (I used glue sticks cut to about 1/3" long to float the tin. On top of that, again using a piece of glue stick I put test tubes, held by a piece of wire.

In the test tubes I would put either real roses or ones that I made from ribbon and floral wire and tape. I also wired the units so that they worked together in a checkerboard pattern and put them on 2 dimmer switches. (I had removed the individual power switches from the lights before hanging them as they got in the way.)"

venerdì 3 ottobre 2008

Love is Blund

http://ikeahacker.blogspot.com/2008...e-is-blund.html

Cute overload ahead!

Mette felt in love with Blund at first sight. She says "He just looked at me ... I looked at him... and took him home.... and promised myself to make as many jumpers and trousers as possible for MY BLUND and all the 'Blund Brothers'!

Apparently Blund has quite a few fans and some pretty cool clothes. Go see Blund dressed to the nines on the Blund Group.


Mette's basic knitting pattern is available here, which includes a T-shirt, a vest, a pair of trousers, and a little rucksack for Blund. Awwww....

giovedì 2 ottobre 2008

Narrow shoe cabinet for small landing strip

http://ikeahacker.blogspot.com/2008...ll-landing.html

Idoia found the Sandnes shoe cabinet with 4 compartments (pix, right) too large for her space and decided to hack it into half.

She says, "It is the Sandnes shoe cabinet with 4 comparment (37 3/4 x 35 3/8") [link to a vertical version, which hey, could have saved Idoia the hacking!] but it was too big for my hall entry (if you can call this small space a hall. I cut it, painted it in black and made a little decoupage on the corners so it looked kind of old."

mercoledì 1 ottobre 2008

Magiker decoupaged coffee table

http://ikeahacker.blogspot.com/2008...ffee-table.html

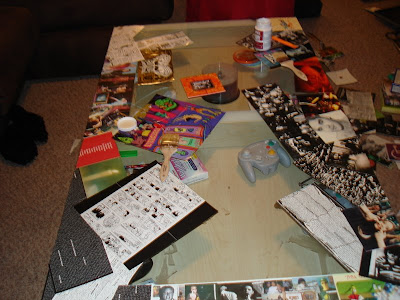
Monica got a Magiker coffee table (link no longer available) but was soon sick of people seeing all her junk under the glass. So she took old CD covers and pasted them on the top of the glass. Then mod podged over on top of that, and a polyurethane spray on top of that!